If you have never gone through a foundation repair before, the process can feel intimidating. You have heard the number. You know crews will be at your home for several days. You are wondering what happens to your yard, your floors, your family’s routine, and the structure of your home while the work is being done.
These are completely reasonable concerns, and the fact that most foundation repair companies do not explain the process clearly before the work begins makes them worse.
This guide walks you through exactly what happens at every stage of a professional foundation repair in North Texas, from the first call through the post-repair engineering inspection. It covers what is normal, what to watch for, and how to prepare your home and family so the process goes as smoothly as possible.
Stage 1: The Initial Call and Scheduling
The process begins when you contact Tri-County Foundation Repair by phone at (817) 406-4094 or through the contact form on the website. During this initial conversation, you provide your name, address, phone number, email, and a description of the symptoms you are experiencing.
This first call is not a sales appointment. Its purpose is to gather the basic information needed to engage the engineering inspection. You will not receive a repair quote during this call because a quote without an engineering diagnosis is not a quote. It is a guess.
Within 24 hours of your initial contact, the assigned structural engineer reaches out to you directly to schedule the site inspection. This is one of the most meaningful differences between an engineering-first process and a sales-first process: the first professional who contacts you about your foundation problem is a licensed engineer, not a salesperson.
Stage 2: The Engineering Inspection
The structural engineering inspection is the foundation of the entire repair process, and it is worth understanding exactly what it involves.
The engineer visits your property and performs a systematic assessment of both the interior and exterior of the home. This typically takes two to four hours depending on the size and complexity of the property.
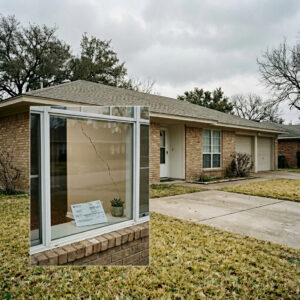
Interior assessment: The engineer evaluates floor levelness using precision instruments, examines every door and window for binding or misalignment, documents all visible cracking in walls, ceilings, and flooring, and identifies any areas where structural displacement is observable above the foundation.
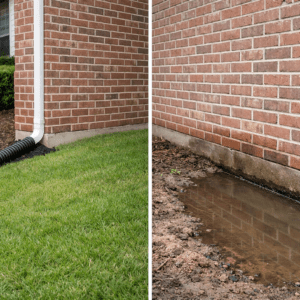
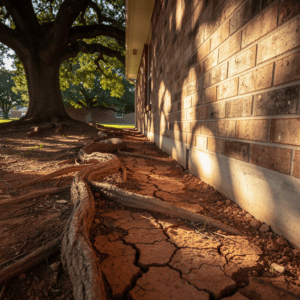
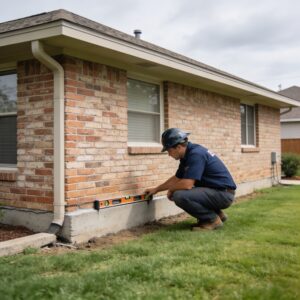
Exterior assessment: The engineer examines the perimeter of the foundation, documents any visible cracks or separation, evaluates drainage and grading conditions, checks for signs of soil erosion or settlement adjacent to the structure, and assesses the relationship between the soil, the foundation edge, and any adjacent concrete.
Elevation survey: Using a water level or laser elevation device, the engineer maps the relative elevation of the foundation across multiple measurement points. This produces a data-driven picture of where the foundation has moved and by how much.
Report production: After the inspection, the engineer produces a written report that documents findings, identifies the type and location of foundation distress, and recommends a specific repair scope. This report belongs to you. You can use it to obtain estimates from multiple contractors before making any decision.
The engineering inspection at Tri-County Foundation Repair costs $1,100. If you choose us for the repair, that fee is credited against the project total. For a full breakdown of what the inspection includes and why it protects your investment, see our post on what the $1,100 foundation inspection actually includes.
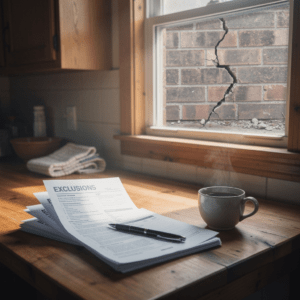
Stage 3: Reviewing the Estimate and Signing the Contract
Once you have the engineering report in hand and have decided to proceed with Tri-County Foundation Repair, you receive a detailed written estimate that references the specific findings in the engineering report.
The estimate outlines the repair scope, including the number and type of piers or structural interventions proposed, the timeline for the work, the warranty coverage that applies, and the total project cost with the inspection fee credit applied.
Read the contract carefully before signing. Specifically confirm:
- The repair scope matches the engineering report’s recommendations
- The warranty terms are stated in writing, including what is covered, for how long, and whether it transfers to future owners
- The timeline and crew assignment are specified
- The post-repair engineering inspection is included in the scope
Do not sign a contract for foundation repair that is not directly tied to a specific engineering report. If a contractor cannot explain how their proposed scope addresses the specific findings in your engineering report, that is a serious concern.
Stage 4: Pre-Repair Preparation
Before the crew arrives, there are several things you can do to make the process smoother and protect your property:
Clear access paths. The crew will need access to the exterior of your foundation perimeter. Clear any furniture, potted plants, decorative items, or storage from along the exterior foundation walls. If there are gates that need to be open for crew or equipment access, confirm these are unlocked before the start date.
Move breakables inside. Foundation leveling can cause vibration through the structure. Items that are already slightly off-balance on shelves, countertops, or mantels should be moved to safer positions. Framed pictures may shift on walls.
Photograph your home interior and exterior. Take dated photos of every door, window, wall crack, and floor condition you are aware of before work begins. This creates a pre-repair baseline that is useful for both warranty purposes and for evaluating the results after work is complete.
Plan for some interior disruption. For pier and beam work, crews access the structure from beneath the home through the crawl space. For slab work requiring tunneling, a portion of your interior flooring will be opened for access. In both cases, dust and minor vibration are normal parts of the process. Cover furniture near work areas with drop cloths if desired.
Alert neighbors if needed. Equipment and material delivery, along with construction activity, generates noise during working hours. If your neighbors are particularly close or if there are specific hours of sensitivity, a courtesy heads-up is appreciated by most people.
Stage 5: The Active Repair
This is where the work actually happens. What the active repair looks like depends on your foundation type.
Pier and Beam Repair: What to Expect
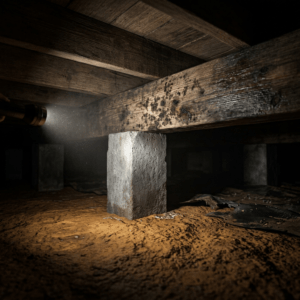
Most pier and beam foundation repairs in North Texas are completed in 2 to 3 days. The crew works primarily from within the crawl space beneath the home.
Day 1: Crew arrives, reviews the engineering report with the lead technician, and establishes the work sequence. Materials including new piers, beams, hardware, and shims are staged. The crew enters the crawl space and begins assessing the condition of existing piers and beams against the engineering findings.
Day 2 (and Day 3 if needed): The structural work proceeds according to the engineering report. This may include replacing failing piers with new concrete piers, sistering or replacing deteriorated beams, adjusting shims to re-level the beam system to its target elevation, and installing or replacing vapor barrier material. The leveling process is performed gradually, lifting the structure in measured increments to avoid creating new stress in finished surfaces above.
During leveling, you will likely hear and feel the building shifting. Doors that have been stuck may suddenly open freely. Small cracks in drywall may open slightly or close. This is normal and expected. Do not be alarmed by sounds during the active leveling process.
Final walkthrough: At the end of the repair, the lead technician walks the property with you, confirms that the work matches the engineering report scope, and documents any observations for the post-repair inspection.
Slab Foundation Repair: What to Expect
Slab repairs range from 3 to 7 days depending on scope. The process is more varied because different repair methods have different execution sequences.
Exterior pier installation (no tunneling required): If all repair points are accessible from outside the foundation perimeter, the crew excavates pits at each pier location along the exterior, installs steel push piers or helical piers to the required depth, and uses hydraulic equipment to lift the foundation to its target elevation. Pits are then backfilled and compacted. This process generates significant soil disturbance along the exterior foundation perimeter. Landscaping in these areas will be disturbed and should be replanted after the repair is complete.
Interior pier installation (tunneling required): When interior repair points are required, tunneling beneath the slab provides access without cutting through the finished floor. Tunnel entry points are opened in the flooring, and crews work beneath the slab to excavate access to the required pier locations. After pier installation and leveling, tunnels are backfilled and compacted. Flooring at the access points is restored.
During slab leveling: The hydraulic lift process is performed slowly and deliberately. You may hear cracking sounds as the slab moves, which are the existing cracks in the concrete responding to movement. Doors and windows may shift. Some drywall cracks that were open may close and some new hairline cracks may appear as the structure adjusts. Both are normal consequences of re-leveling a slab that has settled over time.
Stage 6: The Post-Repair Engineering Inspection
After the active repair work is complete, the same licensed structural engineer who performed the initial inspection returns to the property to verify the repair outcome.
The post-repair inspection confirms that the work was performed according to the repair scope specified in the engineering report, that the foundation has been restored to the target elevation, and that no new distress has been introduced by the repair process.
This is the step that separates engineering-based repair from sales-based repair. The engineer’s post-repair verification gives you an independent professional confirmation that the job was done correctly, and that documentation becomes part of your permanent property record.
The post-repair inspection report is your most important document for future warranty claims, insurance discussions, and real estate transactions. Store it with your property records.
What to Watch For After Repair
The first 60 to 90 days after foundation repair are an adjustment period. Some observations during this window are normal. Others warrant follow-up.
Normal: Doors or windows that open and close differently than before, some hairline drywall cracks closing or slightly opening as the structure settles into its corrected position, minor soil settling around exterior excavation areas.
Worth monitoring: Any new cracks that are growing or are wider than 1/8 inch, any door or window that was corrected by the repair and then begins binding again, any floor area that was leveled and then develops a new slope.
Contact your contractor if: New symptoms appear that were not present before the repair, existing symptoms that were corrected return within the warranty period, or you observe anything about the repair area that does not look right.
If you are trying to distinguish between normal post-repair behavior and genuine new movement, our post on Foundation Issues or Normal House Settling provides a useful framework for evaluating what you are seeing.
And if you had any doubts about whether waiting to address your foundation problem was the right call before this repair, our breakdown of how much waiting actually costs month by month puts that in financial perspective for the future.
Frequently Asked Questions: What to Expect During Foundation Repair
How long does foundation repair take in North Texas?
Most pier and beam foundation repairs in North Texas are completed in 2 to 3 days. Slab foundation repairs range from 3 to 7 days depending on the scope and whether tunneling is required for interior pier access. Larger or more complex projects involving extensive pier networks, tunneling, or combined plumbing and foundation work may take longer. Your contractor should provide a specific timeline as part of the written estimate before work begins.
Do I need to leave my home during foundation repair?
In most cases, no. Both pier and beam and slab foundation repairs are typically performed while the family remains in the home. Specific rooms near active tunneling work may be temporarily inaccessible, and there will be noise and vibration during working hours. The only circumstances that might require temporary relocation involve very large-scale tunneling projects where access through multiple interior areas is required simultaneously, which is uncommon in residential repair.
Will foundation repair damage my landscaping?
Exterior slab pier installation requires excavating pits along the foundation perimeter at each pier location. Landscaping, irrigation lines, and any plantings within approximately 2 feet of the foundation may be disturbed in these areas. Discuss landscaping concerns with your contractor before work begins. Most crews make reasonable efforts to preserve existing plantings where possible, but some disturbance is inherent to exterior excavation work.
What does foundation leveling feel like inside the house?
During the leveling process, you may hear cracking sounds, feel vibration through the floors, see doors move or shift, and observe minor changes in drywall cracks. These are all normal consequences of re-leveling a structure that has settled out of its original position. The sounds can be surprising but are not indicators of damage. Your contractor should explain what to expect before the leveling begins.
Will my foundation repair fix all the cracks in my walls?
Foundation repair restores the structural position of your foundation. It does not automatically repair cosmetic damage like drywall cracks, trim gaps, or door frame misalignment that accumulated over years of foundation movement. Some cracks will close as the structure re-levels. Others will remain and require cosmetic repair. A true turnkey repair process, like the one Tri-County Foundation Repair provides through our partnership with Lawrence Construction Services, addresses post-repair interior restoration as part of the complete project scope.
What is a post-repair engineering inspection and do I need one?
A post-repair engineering inspection is a site visit by the licensed structural engineer who originally assessed your foundation, performed after the repair work is complete. The engineer verifies that the repair matches the scope specified in the engineering report and that the foundation has been restored to the target elevation. This inspection provides independent professional verification that the job was done correctly. At Tri-County Foundation Repair, the post-repair engineering inspection is a standard part of our process. The resulting documentation belongs to you and is valuable for warranty, insurance, and real estate purposes.
How do I prepare my home for foundation repair?
Clear access paths along the exterior foundation perimeter and within any areas where interior access is required. Move fragile items away from shelves and walls that may experience vibration during leveling. Photograph your home interior and exterior before work begins to create a pre-repair baseline. Confirm that any gates or access points needed by the crew are unlocked before the start date. If pets will be home during the work, arrange for them to be confined away from active work areas.
What warranty should I receive after foundation repair?
At minimum, you should receive a written warranty that specifies what is covered, the duration of coverage, what triggers a valid warranty claim, and whether the warranty transfers to future owners. At Tri-County Foundation Repair, pier and beam repairs are covered by our Titan Shield 2-Year Foundation Warranty. All slab pilings pushed to refusal carry a lifetime warranty. Both are provided in writing as part of your project documentation.